How to Change Php Upload Max Filesize Are You Sure You Want to Do This Please Try Again Theme
14 May 2019: This article and the code were updated for PHP7 compatibility.
Edifice a content direction organization can seem like a daunting task to the novice PHP developer. Still, it needn't be that difficult. In this tutorial I'll show you lot how to build a basic, only fully functional, CMS from scratch in just a few hours. Yes, it can be washed!
Along the style, you'll learn how to create MySQL databases and tables; how to work with PHP objects, constants, includes, sessions, and other features; how to separate business logic from presentation; how to brand your PHP code more secure, and much more than!
Earlier you begin, cheque out the finished product past clicking the View Demo link to a higher place. (For security reasons this demo is read-only, so you can't add together, modify or delete manufactures.) You can besides click the Download Code link to a higher place to download the complete PHP lawmaking for the CMS, and then you can run it on your own server.
The feature list
Our commencement job is to work out exactly what nosotros want our CMS to practice. The CMS volition accept the following features:
Front:
- The homepage, listing the 5 well-nigh contempo articles
- The article listing folio, listing all manufactures
- The "view article" page, letting visitors see a unmarried article
Dorsum end:
- Admin login/logout
- List all manufactures
- Add a new article
- Edit an existing article
- Delete an existing article
Each article will accept an associated headline, summary, and publication engagement.
Planning it out
Here are the steps we'll need to follow to create our CMS:
- Create the database
- Create the
manufacturesdatabase table - Make a configuration file
- Build the
Commoditycourse - Write the front end-end
index.phpscript - Write the back-end
admin.phpscript - Create the forepart-end templates
- Create the back-terminate templates
- Create the stylesheet and logo image
Set up? Grab a loving cup of tea, and let's get coding!
Step 1: Create the database
The first thing we demand to practice is create a MySQL database to store our content. You lot tin do this every bit follows:
- Run the
mysqlclient programme
Open a terminal window and enter the following:mysql -u username -p
Then enter your MySQL password when prompted.
- Create the database
At themysql>prompt, blazon:create database cms;
Then press Enter.
- Quit the
mysqlclient programme
At themysql>prompt, type:get out
Then press Enter.
That'southward it! You've now created a new, empty database, into which you lot can put your database tables and content.
Step 2: Create the articles database tabular array
Our elementary CMS has merely i database table: articles. This, as you'd imagine, holds all of the articles in the arrangement.
Let's create the schema for the table. A table'southward schema describes the types of data that the table can hold, also as other information about the table.
Create a text file called tables.sql somewhere on your hard drive. Add the following code to the file:
Drib TABLE IF EXISTS articles; CREATE TABLE manufactures ( id smallint unsigned Non Naught auto_increment, publicationDate engagement NOT Aught, # When the commodity was published title varchar(255) Not Cypher, # Total title of the article summary text NOT NULL, # A brusk summary of the commodity content mediumtext Not NULL, # The HTML content of the article Main KEY (id) ); The above code defines the schema for the articles table. It's written in SQL, the language used to create and dispense databases in MySQL (and most other database systems).
Allow'southward intermission the to a higher place code downwardly a petty:
- Create the
articlestableDROP TABLE IF EXISTS manufacturesremoves any existingmanufacturestable (and data — exist careful!) if it already exists. Nosotros do this because nosotros tin can't define a table with the aforementioned name as an existing table.CREATE TABLE manufactures ( )creates the newarticlestable. The stuff inside the parentheses defines the structure of the data within the table, explained below… - Give each article a unique ID
We're now ready to define our tabular array structure. A table consists of a number of fields (besides called columns). Each field holds a specific type of information almost each article.
Showtime, we create an
idfield. This has asmallint unsigned(unsigned small integer) data type, which means information technology tin hold whole numbers from 0 to 65,535. This lets our CMS hold upwards to 65,535 manufactures. We too specify theNOT NULLattribute, which means the field tin't be empty (naught) — this makes life easier for us. We also add theauto_incrementaspect, which tells MySQL to assign a new, unique value to an article'due southidfield when the article record is created. And then the first commodity volition have anidof 1, the 2d will have anidof ii, and so on. We'll utilise this unique value as a handle to refer to the article that we desire to display or edit in the CMS. - Add the
publicationDatefield
The side by side line creates thepublicationDatefield, which stores the date that each article was published. This field has a data blazon ofdate, which means information technology can store date values. - Add the
championshipfield
Side by side we create thetitlefield to hold each article'south title. It has a data type ofvarchar(255), which ways it can store a string of upwardly to 255 characters. - Add the
summaryandcontentfields
The last 2 fields,summaryandcontent, hold a short summary of the article and the article's HTML content respectively. summary has atextinformation type (which tin can hold up to 65,535 characters) andcontenthas amediumtextdata type (which can hold upwardly to 16,777,215 characters). - Add the master primal
The last line within the
CREATE TABLEstatement defines a key for the tabular array. A key is as well called an index, and in simple terms information technology makes it quicker to find data in the table, at the expense of some actress storage space.We brand the
idfield aMain KEY. Each table can only have a singlePRIMARY KEY; this is the central that uniquely identifies each record in the table. In add-on, by calculation this key, MySQL tin can call up an article based on its ID very chop-chop.
At present that we've created our tabular array schema, we demand to load it into MySQL to create the table itself. The easiest style to do this is to open upward a terminal window and alter to the folder containing your tables.sql file, and so run this command:
mysql -u username -p cms < tables.sql
…where username is your MySQL username. cms is the proper name of the database that yous created in Step one.
Enter your password when prompted. MySQL then loads and runs the code in your tables.sql file, creating the manufactures tabular array within the cms database.
Stride 3: Make a configuration file
Now that you've created your database, you're set to start writing your PHP code. Let's kickoff by creating a configuration file to store various useful settings for our CMS. This file will be used by all the script files in our CMS.
Starting time, create a cms folder somewhere in the local website on your computer, to hold all the files relating to the CMS. If you're running XAMPP then the local website volition be in an htdocs folder within your XAMPP folder. Or, if you lot prefer, you tin create a brand new website but for your CMS, and put all the files in that new website's document root folder.
Inside the cms folder, create a file called config.php with the post-obit code:
<?php ini_set( "display_errors", truthful ); date_default_timezone_set( "Australia/Sydney" ); // http://www.php.cyberspace/manual/en/timezones.php define( "DB_DSN", "mysql:host=localhost;dbname=cms" ); define( "DB_USERNAME", "username" ); define( "DB_PASSWORD", "password" ); define( "CLASS_PATH", "classes" ); ascertain( "TEMPLATE_PATH", "templates" ); define( "HOMEPAGE_NUM_ARTICLES", 5 ); ascertain( "ADMIN_USERNAME", "admin" ); define( "ADMIN_PASSWORD", "mypass" ); require( CLASS_PATH . "/Article.php" ); function handleException( $exception ) { repeat "Sorry, a problem occurred. Please try later."; error_log( $exception->getMessage() ); } set_exception_handler( 'handleException' ); ?> Allow's break this file downward:
- Display errors in the browser
Theini_set()line causes fault messages to be displayed in the browser. This is good for debugging, simply information technology should exist gear up tofalseon a live site since information technology can be a security adventure. - Ready the timezone
As our CMS will use PHP'due southdate()part, we need to tell PHP our server's timezone (otherwise PHP generates a alarm message). Mine is set to"Australia/Sydney"— change this value to your local timezone. - Set the database admission details
Adjacent we ascertain a constant,DB_DSN, that tells PHP where to find our MySQL database. Make sure thedbnameparameter matches the proper name of your CMS database (cmsin this case). Nosotros likewise store the MySQL username and password that are used to admission the CMS database in the constantsDB_USERNAMEandDB_PASSWORD. Set these values to your MySQL username and countersign. - Set the paths
We gear up 2 path names in our config file:CLASS_PATH, which is the path to the form files, andTEMPLATE_PATH, which is where our script should look for the HTML template files. Both these paths are relative to our superlative-levelcmsfolder. - Set the number of manufactures to display on the homepage
HOMEPAGE_NUM_ARTICLEScontrols the maximum number of article headlines to brandish on the site homepage. We've set this to 5 initially, but if you want more or less articles, just change this value. - Set the admin username and password
TheADMIN_USERNAMEandADMIN_PASSWORDconstants comprise the login details for the CMS admin user. Over again, y'all'll want to alter these to your own values. - Include the
Commoditygrade
Since theCommoditygrade file — which we'll create adjacent — is needed past all scripts in our awarding, we include information technology here. - Create an exception handler
Finally, nosotros ascertainhandleException(), a uncomplicated function to handle whatever PHP exceptions that might exist raised as our code runs. The part displays a generic error bulletin, and logs the bodily exception message to the web server's error log. In item, this function improves security by handling any PDO exceptions that might otherwise display the database username and countersign in the page. Once nosotros've definedhandleException(), we set it every bit the exception handler by calling PHP'sset_exception_handler()office.
Stride 4: Build the Article class
You lot're now ready to build the Commodity PHP course. This is the only class in our CMS, and information technology handles the nitty-gritty of storing manufactures in the database, also every bit retrieving manufactures from the database. In one case we've built this class, it volition exist really like shooting fish in a barrel for our other CMS scripts to create, update, recall and delete articles.
Within your cms folder, create a classes folder. Within that classes folder, create a new file called Article.php, and put the post-obit lawmaking into it:
<?php /** * Class to handle articles */ class Article { // Backdrop /** * @var int The article ID from the database */ public $id = zip; /** * @var int When the article was published */ public $publicationDate = null; /** * @var string Full championship of the article */ public $championship = naught; /** * @var string A short summary of the article */ public $summary = zip; /** * @var cord The HTML content of the article */ public $content = cipher; /** * Sets the object's backdrop using the values in the supplied array * * @param assoc The belongings values */ public role __construct( $data=assortment() ) { if ( isset( $data['id'] ) ) $this->id = (int) $data['id']; if ( isset( $data['publicationDate'] ) ) $this->publicationDate = (int) $data['publicationDate']; if ( isset( $data['championship'] ) ) $this->championship = preg_replace ( "/[^\.\,\-\_\'\"\@\?\!\:\$ a-zA-Z0-ix()]/", "", $information['title'] ); if ( isset( $data['summary'] ) ) $this->summary = preg_replace ( "/[^\.\,\-\_\'\"\@\?\!\:\$ a-zA-Z0-9()]/", "", $data['summary'] ); if ( isset( $data['content'] ) ) $this->content = $data['content']; } /** * Sets the object's properties using the edit form mail values in the supplied array * * @param assoc The form post values */ public part storeFormValues ( $params ) { // Store all the parameters $this->__construct( $params ); // Parse and store the publication date if ( isset($params['publicationDate']) ) { $publicationDate = explode ( '-', $params['publicationDate'] ); if ( count($publicationDate) == three ) { list ( $y, $m, $d ) = $publicationDate; $this->publicationDate = mktime ( 0, 0, 0, $m, $d, $y ); } } } /** * Returns an Commodity object matching the given article ID * * @param int The commodity ID * @return Article|false The commodity object, or simulated if the record was not found or at that place was a problem */ public static role getById( $id ) { $conn = new PDO( DB_DSN, DB_USERNAME, DB_PASSWORD ); $sql = "SELECT *, UNIX_TIMESTAMP(publicationDate) AS publicationDate FROM manufactures WHERE id = :id"; $st = $conn->prepare( $sql ); $st->bindValue( ":id", $id, PDO::PARAM_INT ); $st->execute(); $row = $st->fetch(); $conn = null; if ( $row ) return new Article( $row ); } /** * Returns all (or a range of) Article objects in the DB * * @param int Optional The number of rows to return (default=all) * @render Assortment|false A ii-element array : results => array, a list of Article objects; totalRows => Total number of articles */ public static function getList( $numRows=one thousand thousand ) { $conn = new PDO( DB_DSN, DB_USERNAME, DB_PASSWORD ); $sql = "SELECT SQL_CALC_FOUND_ROWS *, UNIX_TIMESTAMP(publicationDate) AS publicationDate FROM manufactures Lodge Past publicationDate DESC LIMIT :numRows"; $st = $conn->fix( $sql ); $st->bindValue( ":numRows", $numRows, PDO::PARAM_INT ); $st->execute(); $list = array(); while ( $row = $st->fetch() ) { $article = new Article( $row ); $list[] = $article; } // Now get the total number of manufactures that matched the criteria $sql = "SELECT FOUND_ROWS() Every bit totalRows"; $totalRows = $conn->query( $sql )->fetch(); $conn = null; return ( array ( "results" => $list, "totalRows" => $totalRows[0] ) ); } /** * Inserts the current Article object into the database, and sets its ID property. */ public office insert() { // Does the Commodity object already have an ID? if ( !is_null( $this->id ) ) trigger_error ( "Article::insert(): Effort to insert an Commodity object that already has its ID property prepare (to $this->id).", E_USER_ERROR ); // Insert the Commodity $conn = new PDO( DB_DSN, DB_USERNAME, DB_PASSWORD ); $sql = "INSERT INTO articles ( publicationDate, title, summary, content ) VALUES ( FROM_UNIXTIME(:publicationDate), :title, :summary, :content )"; $st = $conn->prepare ( $sql ); $st->bindValue( ":publicationDate", $this->publicationDate, PDO::PARAM_INT ); $st->bindValue( ":title", $this->title, PDO::PARAM_STR ); $st->bindValue( ":summary", $this->summary, PDO::PARAM_STR ); $st->bindValue( ":content", $this->content, PDO::PARAM_STR ); $st->execute(); $this->id = $conn->lastInsertId(); $conn = null; } /** * Updates the electric current Article object in the database. */ public part update() { // Does the Article object take an ID? if ( is_null( $this->id ) ) trigger_error ( "Commodity::update(): Endeavour to update an Article object that does non have its ID holding gear up.", E_USER_ERROR ); // Update the Commodity $conn = new PDO( DB_DSN, DB_USERNAME, DB_PASSWORD ); $sql = "UPDATE manufactures Fix publicationDate=FROM_UNIXTIME(:publicationDate), title=:title, summary=:summary, content=:content WHERE id = :id"; $st = $conn->set up ( $sql ); $st->bindValue( ":publicationDate", $this->publicationDate, PDO::PARAM_INT ); $st->bindValue( ":title", $this->championship, PDO::PARAM_STR ); $st->bindValue( ":summary", $this->summary, PDO::PARAM_STR ); $st->bindValue( ":content", $this->content, PDO::PARAM_STR ); $st->bindValue( ":id", $this->id, PDO::PARAM_INT ); $st->execute(); $conn = null; } /** * Deletes the current Article object from the database. */ public role delete() { // Does the Article object have an ID? if ( is_null( $this->id ) ) trigger_error ( "Commodity::delete(): Attempt to delete an Article object that does not have its ID property ready.", E_USER_ERROR ); // Delete the Article $conn = new PDO( DB_DSN, DB_USERNAME, DB_PASSWORD ); $st = $conn->prepare ( "DELETE FROM articles WHERE id = :id LIMIT ane" ); $st->bindValue( ":id", $this->id, PDO::PARAM_INT ); $st->execute(); $conn = null; } } ?> This file is quite long, but information technology's fairly simple stuff when y'all break information technology down. Let's accept a look at each section of the code:
1. The class definition and properties
First, we brainstorm to define our Article form with the code:
class Article { Everything after these lines of code — up until the closing brace at the stop of the file — contains the code that makes upward the Article class.
After starting our class definition, we declare the properties of the class: $id, $publicationDate, and then on. Each Article object that nosotros create will store its article data in these backdrop. You can see that the holding names mirror the field names in our articles database tabular array.
two. The constructor
Next we create the class methods. These are functions that are tied to the class, as well equally to objects created from the course. Our principal lawmaking can call these methods in guild to manipulate the information in the Article objects.
The first method, __construct(), is the constructor. This is a special method that is called automatically past the PHP engine whenever a new Commodity object is created. Our constructor takes an optional $data array containing the data to put into the new object's properties. Nosotros and so populate those properties inside the body of the constructor. This gives us a handy style to create and populate an object in i become.
Yous'll notice that the method filters the data before it stores them in the properties. The id and publicationDate backdrop are cast to integers using (int), since these values should always exist integers. The title and summary are filtered using a regular expression to merely let a certain range of characters. Information technology's good security practice to filter data on input like this, only allowing acceptable values and characters through.
We don't filter the content property, however. Why? Well, the administrator volition probably want to use a wide range of characters, also as HTML markup, in the article content. If we restricted the range of allowed characters in the content and so we would limit the usefulness of the CMS for the ambassador.
Normally this could be a security loophole, since a user could insert malicious JavaScript and other nasty stuff in the content. Even so, since nosotros presumably trust our site administrator — who is the only person allowed to create the content — this is an acceptable tradeoff in this case. If you were dealing with user-generated content, such every bit comments or forum posts, then you would want to be more careful, and only let "safe" HTML to be used. A actually smashing tool for this is HTML Purifier, which thoroughly analyses HTML input and removes all potentially malicious lawmaking.
3. storeFormValues()
Our next method, storeFormValues(), is similar to the constructor in that it stores a supplied assortment of data in the object's backdrop. The main difference is that storeFormValues() tin handle information in the format that is submitted via our New Article and Edit Article forms (which nosotros'll create later on). In particular, it tin handle publication dates in the format YYYY-MM-DD, converting the date into the UNIX timestamp format suitable for storing in the object.
The purpose of this method is simply to brand information technology easy for our admin scripts to store the data submitted by the forms. All they have to practise is telephone call storeFormValues(), passing in the array of form data.
4. getById()
Now we come to the methods that actually access the MySQL database. The commencement of these, getById(), accepts an article ID statement ($id), then retrieves the commodity record with that ID from the articles table, and stores it in a new Article object.
Usually, when you call a method, you first create or retrieve an object, so phone call the method on that object. However, since this method returns a new Article object, it would be helpful if the method could be called directly past our calling code, and not via an existing object. Otherwise, nosotros would have to create a new dummy object each time we wanted to call the method and retrieve an commodity.
To enable our method to be chosen without needing an object, nosotros add the static keyword to the method definition. This allows the method to be chosen straight without specifying an object:
public static part getById( $id ) { The method itself uses PDO to connect to the database, retrieve the commodity record using a SELECT SQL statement, and store the commodity data in a new Article object, which is then returned to the calling lawmaking.
Let'south break this method downward:
- Connect to the database
$conn = new PDO( DB_DSN, DB_USERNAME, DB_PASSWORD );
This makes a connexion to the MySQL database using the login details from the
config.phpfile, and stores the resulting connection handle in$conn. This handle is used by the remaining lawmaking in the method to talk to the database. - Retrieve the commodity record
$sql = "SELECT *, UNIX_TIMESTAMP(publicationDate) AS publicationDate FROM articles WHERE id = :id"; $st = $conn->ready( $sql ); $st->bindValue( ":id", $id, PDO::PARAM_INT ); $st->execute(); $row = $st->fetch();
Our
SELECTstatement retrieves all fields (*) from the record in thearticlestabular array that matches the givenidfield. It also retrieves thepublicationDatefield in UNIX timestamp format instead of the default MySQL date format, so nosotros tin can store it easily in our object.Rather than placing our
$idparameter directly inside theSELECTstring, which tin exist a security take chances, we instead use:id. This is known as a placeholder. In a infinitesimal, nosotros'll call a PDO method to bind our$idvalue to this placeholder.In one case we've stored our
SELECTargument in a string, we gear up the statement past calling$conn->set up(), storing the resulting statement handle in a$stvariable.We now demark the value of our
$idvariable — that is, the ID of the article we desire to retrieve — to our:idplaceholder by calling thebindValue()method. We pass in the placeholder name; the value to demark to it; and the value's information type (integer in this case) and then that PDO knows how to correctly escape the value.Lastly, we call
execute()to run the query, then we utilisefetch()to retrieve the resulting record as an associative assortment of field names and corresponding field values, which we store in the$rowvariable. - Close the connectedness
$conn = null;
Since nosotros no longer demand our connection, we close information technology by assigning
nullto the$connvariable. It's a good idea to shut database connections as soon as possible to complimentary up retention on the server. - Return the new
Articleobjectif ( $row ) render new Article( $row ); }
The last thing our method needs to do is create a new
Articleobject that stores the record returned from the database, and return this object to the calling code. Commencement it checks that the returned value from thefetch()call,$row, does in fact contain data. If it does so it creates a newArticleobject, passing in$rowas it does so. Recollect that this calls our constructor that we created earlier, which populates the object with the data contained in the$rowarray. We and then render this new object, and our work here is washed.
five. getList()
Our next method, getList(), is similar in many ways to getById(). The main divergence, as you might imagine, is that it tin recollect many manufactures at once, rather than just 1 article. It's used whenever we need to display a list of manufactures to the user or administrator.
getList() accepts an optional argument:
-
$numRows - The maximum number of articles to remember. We default this value to 1,000,000 (i.east. effectively all articles). This parameter allows us to brandish, say, just the starting time five articles on the site homepage.
Much of this method's code is similar to getById(). Let's look at a few lines of interest:
          $sql = "SELECT SQL_CALC_FOUND_ROWS *, UNIX_TIMESTAMP(publicationDate) AS publicationDate FROM articles
          Society By publicationDate DESC LIMIT :numRows";
Our query is a chip more circuitous than last fourth dimension. Kickoff, observe that there'southward no WHERE clause this time; this is because we want to retrieve all articles, rather than an article that matches a specific ID.
We've as well added aLIMIT clause, passing in the $numRows parameter (as a placeholder), so that nosotros can optionally limit the number of records returned.
Finally, the special MySQL value SQL_CALC_FOUND_ROWS tells MySQL to render the actual number of records returned; this information is useful for displaying to the user, as well equally for other things similar pagination of results.
$list = assortment(); while ( $row = $st->fetch() ) { $article = new Commodity( $row ); $list[] = $commodity; } Since we're returning multiple rows, we create an array, $list, to concur the corresponding Article objects. We and then use a while loop to recollect the next row via fetch(), create a new Article object, shop the row values in the object, and add the object to the $listing array. When there are no more than rows, fetch() returns false and the loop exits.
// Now get the total number of articles that matched the criteria $sql = "SELECT FOUND_ROWS() Every bit totalRows"; $totalRows = $conn->query( $sql )->fetch(); $conn = nothing; return ( array ( "results" => $list, "totalRows" => $totalRows[0] ) );
Finally, we run another query that uses the MySQL FOUND_ROWS() function to get the number of returned rows calculated by our previous SQL_CALC_FOUND_ROWS command. This fourth dimension we employ the PDO query() method, which lets us apace run a query if in that location are no placeholders to demark. Nosotros call fetch() on the resulting statement handle to call back the result row, so render both the list of Commodity objects ($listing) and the total row count as an associative array.
half dozen. insert()
The remaining methods in our Article grade bargain with calculation, irresolute and deleting article records in the database.
insert() adds a new article tape to the articles tabular array, using the values stored in the current Article object:
- First, the method makes certain that the object doesn't already have its
$idproperty set. If information technology does take an ID then the article presumably already exists in the database, then nosotros shouldn't try to insert it again. - Then the method runs an SQL
INSERTquery to insert the record into themanufacturestabular array, using placeholders to pass the property values to the database. Note the utilise of the MySQLFROM_UNIXTIME()function to convert the publication date from UNIX timestamp format dorsum into MySQL format. - Afterward running the query, the method retrieves the new commodity record's ID using the PDO
lastInsertId()part, and stores it in the object'due south$idproperty for hereafter reference. Call up that we prepare themanufacturestable'sidfield every bit anauto_incrementfield, and then that MySQL generates a new unique ID for each new commodity record.
7. update()
This method is similar to insert(), except that information technology updates an existing article record in the database instead of creating a new record.
Starting time it checks that the object has an ID, since y'all tin can't update a record without knowing its ID. Then it uses the SQL UPDATE argument to update the record'due south fields. Detect that nosotros laissez passer the object'due south ID to the UPDATE statement so that it knows which tape to update.
5. delete()
The delete() method is pretty self-explanatory. It uses the SQL DELETE statement to remove the article stored in the object from the manufactures table, using the object'due south $id property to identify the record in the table. For safety reasons, nosotros add LIMIT 1 to the query to brand sure that but ane article tape tin be deleted at a fourth dimension.
Step 5: Write the front-terminate index.php script

We've at present created our Article class, which does the heavy lifting for our CMS. Now that's out of the way, the rest of the code is pretty simple!
Beginning, let's create index.php, the script that controls the display of the front-end pages of the site. Save this file in the cms folder y'all created before, at the start of Stride iv:
<?php crave( "config.php" ); $action = isset( $_GET['action'] ) ? $_GET['action'] : ""; switch ( $activity ) { example 'archive': archive(); break; case 'viewArticle': viewArticle(); pause; default: homepage(); } function archive() { $results = array(); $data = Article::getList(); $results['articles'] = $information['results']; $results['totalRows'] = $data['totalRows']; $results['pageTitle'] = "Article Archive | Widget News"; require( TEMPLATE_PATH . "/archive.php" ); } function viewArticle() { if ( !isset($_GET["articleId"]) || !$_GET["articleId"] ) { homepage(); return; } $results = array(); $results['commodity'] = Article::getById( (int)$_GET["articleId"] ); $results['pageTitle'] = $results['article']->title . " | Widget News"; require( TEMPLATE_PATH . "/viewArticle.php" ); } function homepage() { $results = array(); $data = Commodity::getList( HOMEPAGE_NUM_ARTICLES ); $results['articles'] = $data['results']; $results['totalRows'] = $information['totalRows']; $results['pageTitle'] = "Widget News"; crave( TEMPLATE_PATH . "/homepage.php" ); } ?> Let'southward break this script down:
- Include the config file
The first line of code includes theconfig.phpfile we created earlier, and then that all the configuration settings are bachelor to the script. Nosotros utilizerequire()rather thaninclude();require()generates an mistake if the file can't be found. - Grab the
activityparameterWe shop the
$_GET['action']parameter in a variable called$activity, and so that we can apply the value later in the script. Earlier doing this, we check that the$_GET['action']value exists by usingisset(). If it doesn't, we gear up the respective$activenessvariable to an empty string (""). - Make up one's mind which activeness to perform
Theswitchblock looks at theactionparameter in the URL to make up one's mind which activeness to perform (display the archive, or view an commodity). If noactivityparameter is in the URL then the script displays the site homepage. -
archive()
This role displays a list of all the articles in the database. It does this by calling thegetList()method of theArticleclass that we created earlier. The role then stores the results, forth with the page championship, in a$resultsassociative array so the template tin display them in the page. Finally, it includes the template file to brandish the page. (Nosotros'll create the templates in a moment.) -
viewArticle()
This function displays a single article page. It retrieves the ID of the article to brandish from thearticleIdURL parameter, then calls theArticleclass'sgetById()method to call back the article object, which it stores in the$resultsarray for the template to employ. (If noarticleIdwas supplied, or the article couldn't exist establish, then the role just displays the homepage instead.) -
homepage()
Our last role,homepage(), displays the site homepage containing a list of up toHOMEPAGE_NUM_ARTICLESarticles (5 by default). It'southward much like thearchive()part, except that information technology passesHOMEPAGE_NUM_ARTICLESto thegetList()method to limit the number of articles returned.
Step six: Write the back-end admin.php script
Our admin script is a bit more complex than index.php, since it deals with all the admin functions for the CMS. The bones structure, though, is similar to alphabetize.php.
Save this file, admin.php, in the aforementioned binder as your index.php script:
<?php require( "config.php" ); session_start(); $activity = isset( $_GET['activeness'] ) ? $_GET['action'] : ""; $username = isset( $_SESSION['username'] ) ? $_SESSION['username'] : ""; if ( $activity != "login" && $activeness != "logout" && !$username ) { login(); get out; } switch ( $activeness ) { example 'login': login(); pause; instance 'logout': logout(); break; case 'newArticle': newArticle(); pause; case 'editArticle': editArticle(); break; example 'deleteArticle': deleteArticle(); intermission; default: listArticles(); } function login() { $results = array(); $results['pageTitle'] = "Admin Login | Widget News"; if ( isset( $_POST['login'] ) ) { // User has posted the login form: effort to log the user in if ( $_POST['username'] == ADMIN_USERNAME && $_POST['password'] == ADMIN_PASSWORD ) { // Login successful: Create a session and redirect to the admin homepage $_SESSION['username'] = ADMIN_USERNAME; header( "Location: admin.php" ); } else { // Login failed: display an error message to the user $results['errorMessage'] = "Wrong username or password. Delight attempt once again."; require( TEMPLATE_PATH . "/admin/loginForm.php" ); } } else { // User has not posted the login form yet: display the form require( TEMPLATE_PATH . "/admin/loginForm.php" ); } } function logout() { unset( $_SESSION['username'] ); header( "Location: admin.php" ); } function newArticle() { $results = array(); $results['pageTitle'] = "New Article"; $results['formAction'] = "newArticle"; if ( isset( $_POST['saveChanges'] ) ) { // User has posted the article edit form: relieve the new article $article = new Article; $article->storeFormValues( $_POST ); $article->insert(); header( "Location: admin.php?condition=changesSaved" ); } elseif ( isset( $_POST['abolish'] ) ) { // User has cancelled their edits: return to the article list header( "Location: admin.php" ); } else { // User has non posted the commodity edit form yet: brandish the grade $results['commodity'] = new Commodity; crave( TEMPLATE_PATH . "/admin/editArticle.php" ); } } function editArticle() { $results = array(); $results['pageTitle'] = "Edit Article"; $results['formAction'] = "editArticle"; if ( isset( $_POST['saveChanges'] ) ) { // User has posted the article edit form: save the article changes if ( !$article = Commodity::getById( (int)$_POST['articleId'] ) ) { header( "Location: admin.php?error=articleNotFound" ); return; } $article->storeFormValues( $_POST ); $article->update(); header( "Location: admin.php?status=changesSaved" ); } elseif ( isset( $_POST['abolish'] ) ) { // User has cancelled their edits: return to the article list header( "Location: admin.php" ); } else { // User has non posted the commodity edit form all the same: brandish the form $results['article'] = Article::getById( (int)$_GET['articleId'] ); require( TEMPLATE_PATH . "/admin/editArticle.php" ); } } function deleteArticle() { if ( !$commodity = Article::getById( (int)$_GET['articleId'] ) ) { header( "Location: admin.php?error=articleNotFound" ); render; } $article->delete(); header( "Location: admin.php?condition=articleDeleted" ); } office listArticles() { $results = array(); $data = Commodity::getList(); $results['articles'] = $data['results']; $results['totalRows'] = $data['totalRows']; $results['pageTitle'] = "All Articles"; if ( isset( $_GET['error'] ) ) { if ( $_GET['mistake'] == "articleNotFound" ) $results['errorMessage'] = "Fault: Commodity not establish."; } if ( isset( $_GET['status'] ) ) { if ( $_GET['status'] == "changesSaved" ) $results['statusMessage'] = "Your changes take been saved."; if ( $_GET['status'] == "articleDeleted" ) $results['statusMessage'] = "Article deleted."; } require( TEMPLATE_PATH . "/admin/listArticles.php" ); } ?> Permit's look at some interesting sections of this script:
- Start a user session
Towards the top of the script we call
session_start(). This PHP function starts a new session for the user, which nosotros can use to track whether the user is logged in or not. (If a session for this user already exists, PHP automatically picks information technology upwards and uses information technology.) - Grab the
actionparameter andusernamesession variable
Side by side we store the$_GET['action']parameter in a variable called$activeness, and the$_SESSION['username']session variable in$username, and then that we can use these values after in the script. Before doing this, nosotros cheque that these values exist by usingisset(). If a value doesn't exist and then we set the corresponding variable to an empty string (""). - Cheque the user is logged in
The user shouldn't exist allowed to do anything unless they're logged in every bit an administrator. So the next thing we do is inspect$usernameto see if the session contained a value for theusernamekey, which we use to signify that the user is logged in. If$username's value is empty — and the user isn't already trying to log in or out — then nosotros brandish the login folio and leave immediately. - Decide which action to perform
The
switchblock works much like the i inindex.php: it calls the advisable function based on the value of theactionURL parameter. The default action is to display the list of manufactures in the CMS. -
login()
This is called when the user needs to log in, or is in the process of logging in.If the user has submitted the login form — which we cheque by looking for the
loginform parameter — then the function checks the entered username and password confronting the config valuesADMIN_USERNAMEandADMIN_PASSWORD. If they match then theusernamesession cardinal is set to the admin username, effectively logging them in, and we and so redirect the browser dorsum to theadmin.phpscript, which then displays the list of articles. If the username and password don't match and so the login course is redisplayed with an fault message.If the user hasn't submitted the login course yet and then the office only displays the form.
-
logout()
This function is called when the user elects to log out. It simply removes theusernamesession key and redirects back toadmin.php. -
newArticle()This function lets the user create a new article. If the user has just posted the "new article" form then the office creates a new
Articleobject, stores the course data in the object by callingstoreFormValues(), inserts the article into the database by callinginsert(), and redirects back to the article listing, displaying a "Changes Saved" status message.If the user has non posted the "new article" form yet and so the function creates a new empty
Articleobject with no values, and so uses theeditArticle.phptemplate to display the article edit form using this emptyArticleobject. -
editArticle()This part is similar to
newArticle(), except that it lets the user edit an existing article. When the user saves their changes then the function retrieves the existing article usinggetById(), stores the new values in theArticleobject, then saves the changed object by callingupdate(). (If the commodity isn't plant in the database then the function displays an error.)When displaying the commodity edit form, the function again uses the
getById()method to load the current article field values into the form for editing. -
deleteArticle()
If the user has chosen to delete an article then this function first retrieves the article to exist deleted (displaying an mistake if the commodity couldn't be constitute in the database), then calls the commodity'southdelete()method to remove the article from the database. It and so redirects to the commodity list page, displaying an "commodity deleted" status message. -
listArticles()
The last function inadmin.phpdisplays a list of all articles in the CMS for editing. The function uses theCommodityform'sgetList()method to call up all the articles, then information technology uses thelistArticles.phptemplate to display the list. Along the way, it also checks the URL query parameterserrorandstatusto come across if whatsoever error or status message needs to be displayed in the folio. If so, then it creates the necessary bulletin and passes information technology to the template for display.
Step 7: Create the front-stop templates
We've now created all the PHP code for our CMS'due south functionality. The next pace is to create the HTML templates for both the front-stop and admin pages.
First, the front-end templates.
1. The include files
Create a folder chosen templates inside your cms folder. Now create a folder called include inside the templates folder. In this binder nosotros're going to put the header and footer markup that is mutual to every page of the site, to save having to put it inside every template file.
Create a new file called header.php inside your include binder, with the following lawmaking:
<!DOCTYPE html> <html lang="en"> <head> <championship><?php echo htmlspecialchars( $results['pageTitle'] )?></title> <link rel="stylesheet" blazon="text/css" href="manner.css" /> </caput> <body> <div id="container"> <a href="."><img id="logo" src="images/logo.jpg" alt="Widget News" /></a>
Equally y'all tin can encounter, this lawmaking simply displays the markup to commencement the HTML folio. It uses the $results['pageTitle'] variable passed from the main script (index.php or admin.php) to ready the championship element, and as well links to a stylesheet, style.css (nosotros'll create this in a moment).
Next, create a file chosen footer.php in the same folder:
<div id="footer"> Widget News &re-create; 2011. All rights reserved. <a href="admin.php">Site Admin</a> </div> </div> </body> </html>
This markup finishes off each HTML page in the organization.
ii. homepage.php
Now go support to the templates folder, and create a homepage.php template file in there, with the following code:
<?php include "templates/include/header.php" ?> <ul id="headlines"> <?php foreach ( $results['manufactures'] every bit $commodity ) { ?> <li> <h2> <span class="pubDate"><?php echo date('j F', $commodity->publicationDate)?></bridge><a href=".?action=viewArticle&articleId=<?php echo $commodity->id?>"><?php repeat htmlspecialchars( $article->championship )?></a> </h2> <p class="summary"><?php echo htmlspecialchars( $commodity->summary )?></p> </li> <?php } ?> </ul> <p><a href="./?action=archive">Commodity Archive</a></p> <?php include "templates/include/footer.php" ?> This template displays the article headlines on the homepage every bit an unordered list. It loops through the array of Article objects stored in $results['manufactures'] and displays each article'due south publication engagement, title, and summary. The title is linked back to '.' (alphabetize.php), passing action=viewArticle, besides as the commodity'southward ID, in the URL. This allows the company to read an article by clicking its title.
The template also includes a link to the article annal ("./?action=annal").
3. archive.php
Now create an annal.php template file in your templates folder:
<?php include "templates/include/header.php" ?> <h1>Article Archive</h1> <ul id="headlines" class="archive"> <?php foreach ( $results['articles'] as $article ) { ?> <li> <h2> <span course="pubDate"><?php echo date('j F Y', $commodity->publicationDate)?></span><a href=".?action=viewArticle&articleId=<?php repeat $article->id?>"><?php echo htmlspecialchars( $article->title )?></a> </h2> <p class="summary"><?php echo htmlspecialchars( $article->summary )?></p> </li> <?php } ?> </ul> <p><?php echo $results['totalRows']?> commodity<?php echo ( $results['totalRows'] != 1 ) ? 'southward' : '' ?> in total.</p> <p><a href="./">Render to Homepage</a></p> <?php include "templates/include/footer.php" ?> This template displays the archive of all articles in the CMS. As yous tin see, it's nigh identical to homepage.php. Information technology adds an archive CSS class to the unordered list so we can manner the list items a fleck differently to the homepage, and it as well adds the year to the article publication dates (since the archive might become back a few years).
The folio also includes a total count of the manufactures in the database, retrieved via $results['totalRows']. Finally, instead of the archive link at the lesser of the page, information technology includes a "Render to Homepage" link.
four. viewArticle.php
The final front-stop template displays an commodity to the user. Create a file called viewArticle.php in your templates folder, and add the post-obit markup:
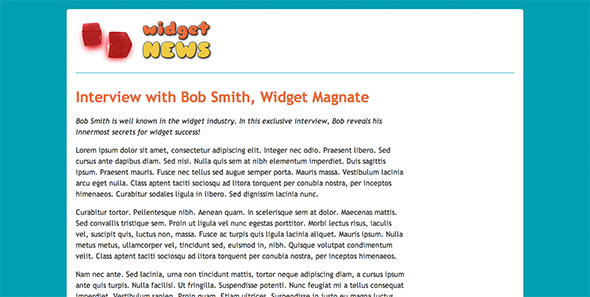
<?php include "templates/include/header.php" ?> <h1 fashion="width: 75%;"><?php echo htmlspecialchars( $results['article']->title )?></h1> <div style="width: 75%; font-style: italic;"><?php echo htmlspecialchars( $results['article']->summary )?></div> <div style="width: 75%;"><?php repeat $results['article']->content?></div> <p class="pubDate">Published on <?php echo appointment('j F Y', $results['article']->publicationDate)?></p> <p><a href="./">Return to Homepage</a></p> <?php include "templates/include/footer.php" ?> This template is very straightforward. It displays the selected commodity's title, summary and content, besides as its publication appointment and a link to return to the homepage.
Step 8: Create the back-finish templates
Now that we've created the templates for the forepart of the site, information technology's fourth dimension to create the 3 admin templates.
1. loginForm.php
Starting time, create some other folder chosen admin inside your templates folder. Inside the admin folder, create the beginning of the 3 templates, loginForm.php:
<?php include "templates/include/header.php" ?> <form action="admin.php?activeness=login" method="mail" style="width: 50%;"> <input type="subconscious" name="login" value="true" /> <?php if ( isset( $results['errorMessage'] ) ) { ?> <div form="errorMessage"><?php repeat $results['errorMessage'] ?></div> <?php } ?> <ul> <li> <label for="username">Username</label> <input type="text" proper noun="username" id="username" placeholder="Your admin username" required autofocus maxlength="20" /> </li> <li> <label for="password">Password</label> <input type="password" proper noun="password" id="password" placeholder="Your admin password" required maxlength="twenty" /> </li> </ul> <div class="buttons"> <input type="submit" name="login" value="Login" /> </div> </class> <?php include "templates/include/footer.php" ?> This page contains the admin login class, which posts back to admin.php?action=login. Information technology includes a hidden field, login, that our login() function from Step vi uses to bank check if the form has been posted. The form too contains an area for displaying any error messages (such every bit an incorrect username or password), besides every bit username and password fields and a "Login" push.
2. listArticles.php
Now create the 2d admin template in your admin folder. This ane'due south called listArticles.php:
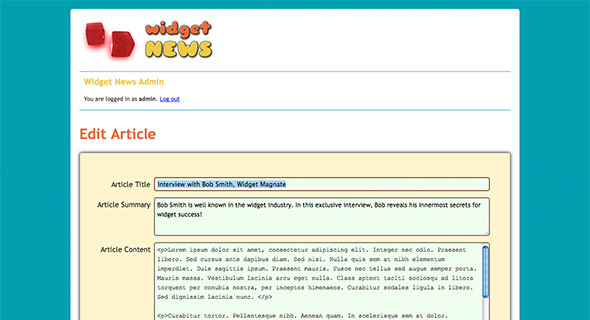
<?php include "templates/include/header.php" ?> <div id="adminHeader"> <h2>Widget News Admin</h2> <p>You are logged in as <b><?php repeat htmlspecialchars( $_SESSION['username']) ?></b>. <a href="admin.php?action=logout"?>Log out</a></p> </div> <h1>All Articles</h1> <?php if ( isset( $results['errorMessage'] ) ) { ?> <div class="errorMessage"><?php echo $results['errorMessage'] ?></div> <?php } ?> <?php if ( isset( $results['statusMessage'] ) ) { ?> <div class="statusMessage"><?php echo $results['statusMessage'] ?></div> <?php } ?> <table> <tr> <th>Publication Engagement</th> <th>Article</th> </tr> <?php foreach ( $results['articles'] as $article ) { ?> <tr onclick="location='admin.php?action=editArticle&articleId=<?php echo $commodity->id?>'"> <td><?php repeat date('j M Y', $article->publicationDate)?></td> <td> <?php echo $article->title?> </td> </tr> <?php } ?> </table> <p><?php echo $results['totalRows']?> commodity<?php echo ( $results['totalRows'] != 1 ) ? 's' : '' ?> in full.</p> <p><a href="admin.php?activeness=newArticle">Add a New Article</a></p> <?php include "templates/include/footer.php" ?> This template displays the list of articles for the administrator to edit. After displaying any fault or status messages, it loops through the array of Article objects stored in $results['articles'], displaying each article's publication date and title in a table row. It also adds a JavaScript onclick event to each article'south table row, so that the ambassador can click an article to edit it.
The template also includes the total commodity count, as well equally a link to let the ambassador add together a new article.
3. editArticle.php
Now save the terminal template, editArticle.php, in your admin folder:
<?php include "templates/include/header.php" ?> <div id="adminHeader"> <h2>Widget News Admin</h2> <p>You are logged in as <b><?php echo htmlspecialchars( $_SESSION['username']) ?></b>. <a href="admin.php?action=logout"?>Log out</a></p> </div> <h1><?php echo $results['pageTitle']?></h1> <form activity="admin.php?activeness=<?php echo $results['formAction']?>" method="post"> <input type="hidden" name="articleId" value="<?php echo $results['article']->id ?>"/> <?php if ( isset( $results['errorMessage'] ) ) { ?> <div class="errorMessage"><?php echo $results['errorMessage'] ?></div> <?php } ?> <ul> <li> <label for="championship">Commodity Title</characterization> <input blazon="text" proper name="title" id="title" placeholder="Name of the article" required autofocus maxlength="255" value="<?php echo htmlspecialchars( $results['article']->championship )?>" /> </li> <li> <label for="summary">Article Summary</label> <textarea name="summary" id="summary" placeholder="Cursory description of the commodity" required maxlength="thousand" style="height: 5em;"><?php echo htmlspecialchars( $results['article']->summary )?></textarea> </li> <li> <characterization for="content">Commodity Content</label> <textarea name="content" id="content" placeholder="The HTML content of the article" required maxlength="100000" style="acme: 30em;"><?php echo htmlspecialchars( $results['commodity']->content )?></textarea> </li> <li> <label for="publicationDate">Publication Date</label> <input type="engagement" proper name="publicationDate" id="publicationDate" placeholder="YYYY-MM-DD" required maxlength="10" value="<?php repeat $results['article']->publicationDate ? date( "Y-thou-d", $results['article']->publicationDate ) : "" ?>" /> </li> </ul> <div class="buttons"> <input type="submit" name="saveChanges" value="Salve Changes" /> <input blazon="submit" formnovalidate name="cancel" value="Cancel" /> </div> </course> <?php if ( $results['article']->id ) { ?> <p><a href="admin.php?action=deleteArticle&articleId=<?php echo $results['article']->id ?>" onclick="return confirm('Delete This Commodity?')">Delete This Article</a></p> <?php } ?> <?php include "templates/include/footer.php" ?> This edit course is used both for creating new articles, and for editing existing articles. It posts to either admin.php?action=newArticle or admin.php?action=editArticle, depending on the value passed in the $results['formAction'] variable. It likewise contains a hidden field, articleId, to track the ID of the article being edited (if whatsoever).
The form likewise includes an area for error letters, also equally fields for the article title, summary, content, and publication date. Finally, there are 2 buttons for saving and cancelling changes, and a link to allow the admin to delete the currently-edited article.
Step 9: Create the stylesheet and logo image
Our CMS application is basically done at present, but in order to brand it look a fleck nicer for both our visitors and the site administrator, we'll create a CSS file to control the look of the site. Relieve this file as style.css in your cms folder:
/* Mode the body and outer container */ body { margin: 0; colour: #333; background-color: #00a0b0; font-family: "Trebuchet MS", Arial, Helvetica, sans-serif; line-meridian: 1.5em; } #container { width: 960px; background: #fff; margin: 20px motorcar; padding: 20px; -moz-border-radius: 5px; -webkit-edge-radius: 5px; border-radius: 5px; } /* The logo and footer */ #logo { display: block; width: 300px; padding: 0 660px 20px 0; border: none; border-bottom: 1px solid #00a0b0; margin-lesser: 40px; } #footer { edge-meridian: 1px solid #00a0b0; margin-top: 40px; padding: 20px 0 0 0; font-size: .8em; } /* Headings */ h1 { color: #eb6841; margin-lesser: 30px; line-height: one.2em; } h2, h2 a { color: #edc951; } h2 a { text-decoration: none; } /* Article headlines */ #headlines { list-style: none; padding-left: 0; width: 75%; } #headlines li { margin-bottom: 2em; } .pubDate { font-size: .8em; color: #eb6841; text-transform: uppercase; } #headlines .pubDate { display: inline-cake; width: 100px; font-size: .5em; vertical-align: middle; } #headlines.annal .pubDate { width: 130px; } .summary { padding-left: 100px; } #headlines.archive .summary { padding-left: 130px; } /* "You are logged in..." header on admin pages */ #adminHeader { width: 940px; padding: 0 10px; border-bottom: 1px solid #00a0b0; margin: -30px 0 40px 0; font-size: 0.8em; } /* Style the class with a coloured background, along with curved corners and a driblet shadow */ form { margin: 20px automobile; padding: 40px 20px; overflow: auto; background: #fff4cf; border: 1px solid #666; -moz-border-radius: 5px; -webkit-border-radius: 5px; border-radius: 5px; -moz-box-shadow: 0 0 .5em rgba(0, 0, 0, .8); -webkit-box-shadow: 0 0 .5em rgba(0, 0, 0, .8); box-shadow: 0 0 .5em rgba(0, 0, 0, .8); } /* Give form elements consistent margin, padding and line height */ form ul { list-style: none; margin: 0; padding: 0; } form ul li { margin: .9em 0 0 0; padding: 0; } form * { line-height: 1em; } /* The field labels */ label { display: cake; float: left; clear: left; text-align: correct; width: xv%; padding: .4em 0 0 0; margin: .15em .5em 0 0; } /* The fields */ input, select, textarea { display: cake; margin: 0; padding: .4em; width: 80%; } input, textarea, .date { border: 2px solid #666; -moz-border-radius: 5px; -webkit-edge-radius: 5px; border-radius: 5px; background: #fff; } input { font-size: .9em; } select { padding: 0; margin-bottom: two.5em; position: relative; acme: .7em; } textarea { font-family: "Trebuchet MS", Arial, Helvetica, sans-serif; font-size: .9em; height: 5em; line-height: 1.5em; } textarea#content { font-family unit: "Courier New", courier, fixed; } /* Place a border effectually focused fields */ form *:focus { border: 2px solid #7c412b; outline: none; } /* Brandish correctly filled-in fields with a green groundwork */ input:valid, textarea:valid { groundwork: #efe; } /* Submit buttons */ .buttons { text-align: center; margin: 40px 0 0 0; } input[type="submit"] { display: inline; margin: 0 20px; width: 12em; padding: 10px; border: 2px solid #7c412b; -moz-border-radius: 5px; -webkit-border-radius: 5px; edge-radius: 5px; -moz-box-shadow: 0 0 .5em rgba(0, 0, 0, .8); -webkit-box-shadow: 0 0 .5em rgba(0, 0, 0, .8); box-shadow: 0 0 .5em rgba(0, 0, 0, .viii); color: #fff; background: #ef7d50; font-weight: bold; -webkit-advent: none; } input[type="submit"]:hover, input[type="submit"]:active { cursor: pointer; groundwork: #fff; color: #ef7d50; } input[type="submit"]:active { background: #eee; -moz-box-shadow: 0 0 .5em rgba(0, 0, 0, .8) inset; -webkit-box-shadow: 0 0 .5em rgba(0, 0, 0, .viii) inset; box-shadow: 0 0 .5em rgba(0, 0, 0, .8) inset; } /* Tables */ table { width: 100%; border-collapse: collapse; } tr, thursday, td { padding: 10px; margin: 0; text-marshal: left; } table, th { border: 1px solid #00a0b0; } th { border-left: none; border-right: none; background: #ef7d50; color: #fff; cursor: default; } tr:nth-child(odd) { background: #fff4cf; } tr:nth-child(even) { background: #fff; } tr:hover { background: #ddd; cursor: pointer; } /* Status and mistake boxes */ .statusMessage, .errorMessage { font-size: .8em; padding: .5em; margin: 2em 0; -moz-border-radius: 5px; -webkit-border-radius: 5px; border-radius: 5px; -moz-box-shadow: 0 0 .5em rgba(0, 0, 0, .8); -webkit-box-shadow: 0 0 .5em rgba(0, 0, 0, .8); -box-shadow: 0 0 .5em rgba(0, 0, 0, .viii); } .statusMessage { background-color: #2b2; border: 1px solid #080; color: #fff; } .errorMessage { groundwork-color: #f22; border: 1px solid #800; color: #fff; } I won't become into the details of the CSS, since this tutorial is almost PHP and MySQL! Suffice to say, it styles things similar the folio layout, colours, fonts, forms, tables and so on.
Last, merely not least, our site needs a logo. Here's 1 I prepared earlier — save it in an images folder inside your cms folder, calling it logo.jpg (or roll your own logo):
![]()
All washed!
We've finished our CMS! To try it out, open up a browser and point it to the base URL of your CMS (for case, http://localhost/cms/). Click the em>Site Admin link in the footer, log in, and add some articles. And so endeavour browsing them on the forepart terminate (click the logo to render to the homepage).
Don't forget you lot tin can try out the demo on my server besides!
In this tutorial you lot've built a basic content management system from the ground upward, using PHP and MySQL. You've learnt about MySQL, tables, field types, PDO, object-oriented programming, templating, security, sessions, and lots more.
While this CMS is pretty bones, it has hopefully given you a starting point for building your ain CMS-driven websites. Some features you might desire to add include:
- Pagination on the commodity annal (forepart end) and article list (dorsum finish) and so that the arrangement can hands handle hundreds of manufactures
- A WYSIWYG editor for easier content editing
- An image upload facility (I've written a follow-upwardly tutorial on adding an image upload feature to the CMS)
- A preview facility, and so the admin tin see how an article will look before publishing it
- Article categories and tags (I've written a follow-upwardly tutorial on calculation categories)
- Integration with Apache'south mod_rewrite to create more homo-friendly permalink URLs for the articles (find out how to practise this)
- A user comments arrangement
I promise y'all've enjoyed this tutorial and found information technology useful. Happy coding!
Source: https://www.elated.com/cms-in-an-afternoon-php-mysql/
0 Response to "How to Change Php Upload Max Filesize Are You Sure You Want to Do This Please Try Again Theme"
Post a Comment